Installing Your Shutters Made Simple
H0W TO INSTALL
Proper installation ensures your shutters not only look great but also stay secure for years to come. Whether you’re attaching them to brick, siding, or stucco, following the right steps will help you achieve a seamless and polished result.
Our step-by-step guide makes the process easy. From the right tools to mounting techniques, we’ll walk you through everything you need to know to install your shutters with confidence.
Learn how to securely install fixed mount shutters using Shutter-Lok fasteners—our standard, included hardware for all vinyl shutters.
For use on: irregular surfaces including: wood, aluminum, vinyl, hardboard, brick, masonry, stone.
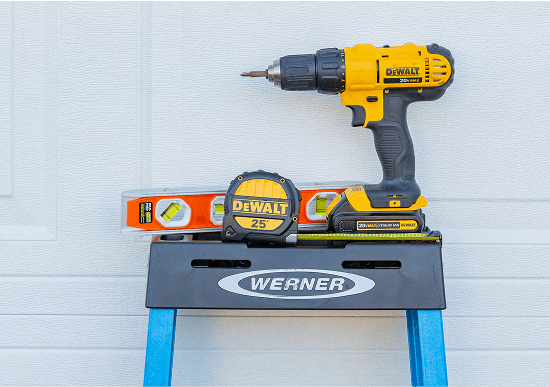
To begin, you will need an eletric drill, 1/4” drill bit, 3/8” drill bit, hammer & Shutter-Loks (included with Duralok purchase).
Place the shutter next to the window and mark desired location against the wall or window.
For smaller sizes use four Shutter-Loks per shutter. For large sizes 55″ and over, use six Shutter-Loks per shutter.
To ensure proper alignement mark or pre-drill holes using a 1/4″ drill bit into the shutter before attaching it to wall.
With the shutter in location against the wall, drill through the shutter into the wall surface 3 1/4″ deep. Make sure you drill holes deep enough so the Shutter-Lok doesn’t bottom out.
Grasp the Shutter-Lok supporting shank and push it through the shutter hole and into the wall surface. Tap the Shutter-Lok gently with a hammer to snug the shutter against the siding. Do not over tighten, or this will cause the shutter to dimple.

Installing your shutters is straightforward, but proper placement is key to a secure, polished finish. Take your time with each step to ensure a perfect fit.
Install with confidence – download our printable guide
Schedule a call or contact us at customersupport@monumentshutter.com
Follow these simple steps for a clean, lasting fit.
Mounting Hardware:
Determine proper position for mounting brackets, using diagram available on our printable installation guide. {PART A}
Pre-drill apropriate pilot holes to avoid cracks or splitting in mounting brackets and shutters.
Drill holes in house exterior for 1 1/2” screws included in packet (if masonry, drill 1/4” to insert plastic anchors).
Measure height of shutter and drill holes for top brackets.
Scew brackets to exterior of house.
If shutter height exceeds 55”, additional small brackets are included to mount as shown in center. Arch top shutters will also include an additional small bracket so secure the arch, to be installed mid-point of arch. {PART B}
Place shutters onto lip of bracket and push back as far as possible. Mark shutter(s) to pre-drill pilot holes into shutter from top & bottom of mounting brackets.
Use a 5/32” bit for this step.Insert 1” screws through bracket and into shutter. Tighten screws snuggly – be careful not to over-tighten.

Installing your shutters is straightforward, but proper placement is key to a secure, polished finish. Take your time with each step to ensure a perfect fit.
Install with confidence – download our printable guide
Schedule a call or contact us at customersupport@monumentshutter.com
Follow these simple steps for a clean, lasting fit.
To begin, you will need an eletric drill, hammer, tilt arm, hinge/eye-end set, slevis pin and shutters.
Begin by pre-drilling holes for the aluminum female hinges at 8-inch increments, starting from the center of the shutter’s edge. This ensures proper alignment and a secure hold once installed.
Slide the female hinge onto the male hinge, which is already attached to the shutter. This connection allows for smooth movement when opening and closing the shutter.
With the hinges connected, place the shutter in the desired closed position against the wall or window frame. Rotate the female hinge until it rests flat against the wall, ensuring a snug fit before securing it in place.
Using the pre-drilled holes in the female hinge, mark their placement on the wall or window frame. Remove the shutter from the wall and drill holes at the marked spots. These holes will serve as guides for installing the hinges securely.
With the holes pre-drilled, screw the female hinges firmly into the wall or window frame. Make sure they are flush against the surface for a stable installation. Once secured, slide the shutter with the male hinge back onto the mounted female hinge.
Mount a hinge/eye onto each stile (the vertical frame pieces of the shutter) approximately 2 inches from the bottom. Position the hinge/eye ¾ inch inward from the outer edge of the stile to ensure proper alignment.
Allow the shutter to hang naturally from the top-mounted hinge. Position a second hinge/eye on the wall so that both hinge/eyes can be pinned together when the shutter is in the closed position. Mark the location, then secure the wall hinge/eye to the structure by screwing it into place.
Open the shutter to your preferred position, ensuring the louvers are horizontal (or set to your desired angle). Connect the tilt arms to the hinge/eyes using the provided clevis pins. Finally, make sure that each stile has hinge/eye clips at the bottom corners and third points up each stile, allowing the shutter to be properly secured when closed.
Video Guide Coming Soon

Installing your shutters is straightforward, but proper placement is key to a secure, polished finish. Take your time with each step to ensure a perfect fit.
Install with confidence – download our printable guide
Schedule a call or contact us at customersupport@monumentshutter.com
Follow these simple steps for a clean, lasting fit.
To begin, you will need an eletric drill, hammer, tilt arm, hinge/eye-end set, slevis pin and shutters.
Place the shutter next to the window and mark desired location against the wall or window.
With the shutter in location against the wall, drill through the shutter into the wall 2 1/2” deep. In brick, the hole dia. should be no greater than .250 inches and positioned over morter joints. Do not attach the shutter at this time.
With the 1/4” holes drilled into the shutter and wall, remove the shutter from the wall. Enlarge the holes in the shutter by using 3/8” drill bit.
Place the Ferrule behind the shutter, lined up with the holes that have been drilled for the Shutter-Loks. Trim the Ferrule to properly fit the gap between the back of the shutter and the wall it is being attached to. The Ferrules may not all be the same length.
Shutter-Loks used in masonry must penetrate at least 7/8” into the wall.
Once the Ferrule is trimmed to the desired length and the shutter is parallel to the wall, insert the Shutter-Lok into the hole in the shutter and through the Ferrule going into the wall.
Tap the Shutter-Lok gently with a hammer to snug the shutter to the siding. Do not over tighten, or this will cause the shutter to dimple.
Video Guide Coming Soon
Installing your shutters is straightforward, but proper placement is key to a secure, polished finish. Take your time with each step to ensure a perfect fit.
Install with confidence – download our printable guide
Schedule a call or contact us at customersupport@monumentshutter.com
Follow these simple steps for a clean, lasting fit.
To begin, you will need 6 Shutter-Clips per shutter, 9 #10 or equivalent (M5 metric) screws per shutter, length of screws is dependent on mounting surface. Other fasteners may be required for specific surfaces. Screw driver, electric drill, level and pencil.
Push a shutter clip partially onto the ribs at each corner of the shutter with the mounting tab extending beyond the shutter (4 places). DO NOT press the Shutter-Clips completly on to the shutter at this time because they will be removed later.
Hold the shutter against the mounting surface in the position where it will be attached. Mark the center of the hole of each shutter clip (4 places).
Draw lines vertically between the top and bottom marks. After completing Step 2, remove the Shutter-Clips from the shutter.
With it’s front facing the mounting surface, align the shutter next to where it will be mounted. On the lines drawn in the previous step, sketch marks corresponding to the mounting areas of the shutter.
Read all of Step 4 and view figure 4 on our printable installation guide before installing Shutter-Clips to mounting surface.
Fasten the shutter clips centered on the vertical line and between the sketch marks drawn in Step 4. Use one screw next to the window and two screw in the shutter clips away from the window.
These clips should be free to move with temperature changes. The mounting bracket on the Shutter-Clip should be placed in the upright position. Different mounting surfaces may require special mounting procedures or techniques.
After the Shutter-Clips are in position and fastened to the mounting surface, attach the shutter.
Place the shutter over the Shutter-Clips and press the ribs of the shutter on to each Shutter-Clip.
Press the shutter firmly against the mounting surface being sure all six clips engage.
Video Guide Coming Soon
Installing your shutters is straightforward, but proper placement is key to a secure, polished finish. Take your time with each step to ensure a perfect fit.
Install with confidence – download our printable guide
Schedule a call or contact us at customersupport@monumentshutter.com
To make rain run away from the window, traditional shutters were mounted with the louvers facing down when closed over the window. To mount your shutters so they are architecturally correct, the louvers will apear upside down when the shutter is in the open position.
If mounting shutters architecturally correct, aliggn shutters beside correct window with louvers facing proper direction.
Place pair of shutters face down on sawhorse side by side and prepare to install hinges.
After determining proper offset, install hinges. Hinges are to be placed flush with the inner edge of the top and bottom rail.
Hinge can also be aligned with the top and bottom of the shutter.
Install slide bolt if required. Turn shutter over and install slide bolt edge flush with shutter edge. Insert screws.
Measure distance from top of shutter to bottom of barrel (female) on the strap. Measure down this distance plus 1/4” from top of window opening and mark with pencil.
Move pintle (male) one inch outside the window opening and down this distance from the top. Distance measured should be to the top of the round ring on the post (male) of the pintle.
Mount top pintle in this place. After three mounting screws are in place, hang shutter on this pintle.
Insert bottom pintle into the barrel on the bottom strap. While holding upward pressure on the pintle, align top and bottom pintles vertically then drill pilot hole for bottom pintle into house.
Insert first screw to secure pintle. Drill two other pilot holes and secure screws to house.
Then repeat the same process for the other shutter.
Tiebacks should be located approximately 1.5” below shutter and 2” in from the outside edge.
Make sure you touch up the head of the bold after tightening. The wrench will scar the head and it will rust if you do not touch up.
All hardware is primed only. After installation, paint all hardware with Krylon or similar rust inhibiting paint.
We suggest using a brush rather than spray paint, paying particular attention to any screw heads that may have been scratched during installation,
Video Guide Coming Soon
Installing your shutters is straightforward, but proper placement is key to a secure, polished finish. Take your time with each step to ensure a perfect fit.
Install with confidence – download our printable guide
Schedule a call or contact us at customersupport@monumentshutter.com
To begin, you will need an eletric drill, hammer, tilt arm, hinge/eye-end set, slevis pin and shutters.
Begin by pre-drilling holes for the aluminum female hinges at 8-inch increments, starting from the center of the shutter’s edge. This ensures proper alignment and a secure hold once installed.
Slide the female hinge onto the male hinge, which is already attached to the shutter. This connection allows for smooth movement when opening and closing the shutter.
With the hinges connected, place the shutter in the desired closed position against the wall or window frame. Rotate the female hinge until it rests flat against the wall, ensuring a snug fit before securing it in place.
Using the pre-drilled holes in the female hinge, mark their placement on the wall or window frame. Remove the shutter from the wall and drill holes at the marked spots. These holes will serve as guides for installing the hinges securely.
With the holes pre-drilled, screw the female hinges firmly into the wall or window frame. Make sure they are flush against the surface for a stable installation. Once secured, slide the shutter with the male hinge back onto the mounted female hinge.
Mount a hinge/eye onto each stile (the vertical frame pieces of the shutter) approximately 2 inches from the bottom. Position the hinge/eye ¾ inch inward from the outer edge of the stile to ensure proper alignment.
Allow the shutter to hang naturally from the top-mounted hinge. Position a second hinge/eye on the wall so that both hinge/eyes can be pinned together when the shutter is in the closed position. Mark the location, then secure the wall hinge/eye to the structure by screwing it into place.
Open the shutter to your preferred position, ensuring the louvers are horizontal (or set to your desired angle). Connect the tilt arms to the hinge/eyes using the provided clevis pins. Finally, make sure that each stile has hinge/eye clips at the bottom corners and third points up each stile, allowing the shutter to be properly secured when closed.
Video Guide Coming Soon
Installing your shutters is straightforward, but proper placement is key to a secure, polished finish. Take your time with each step to ensure a perfect fit.
Install with confidence – download our printable guide
Schedule a call or contact us at customersupport@monumentshutter.com
FAQ
Dive into our FAQ section to learn more about the benefits, features, and usage of our products to better meet your house’s needs.
Highly-recommended
Experience the quality and craftsmanship of our shutters before you buy
For the latest updates from Monument Shutters!
© 2024 Monument Shutters, All rights reserved.
